Tuesday, 15 February 2011

Love cookies


Here are some super easy heart cookies I made for my work colleagues to celebrate Valentine's Day. You can use any colour combinations, or any shape - such a fun recipe to play around with. If you want to make some here's what you need:

Ingredients (makes about 30 medium sized cookies):
  • 120g dark chocolate, broken into pieces
  • 650g plain flour
  • 250g unsalted butter, softened
  • 2 tbsp skimmed milk
  • 3 tsp baking powder
  • 2 medium eggs
  • 300g caster sugar
  • Pink food colouring (optional)
Method:
Melt chocolate in a bowl over a pan of gently simmering water or in the microwave. Be careful not to cook the chocolate!

In a large bowl, combine the flour, eggs, butter, milk, baking powder and caster sugar. Beat the ingredients until well-blended with an electric mixer or spoon, occassionally scraping the bowl with the rubber spatula. Take out half the dough and colour with pink food colouring (or leave plain if you want). Roll the dough into a ball, wrap in cling film then refrigerate until the dough is firm enough to handle (normally about an hour, or 20 mins ni the freezer).
 
Mix the melted chocolate into the remaining dough until blended. Roll the dough into a ball, wrap in cling film and refrigerate until firm.
 
In the meantime, preheat the oven to 180C (350F) and line 2 large baking trays with baking paper. Once the dough is firm enough to work with, roll it out on a lightly floured surface with a rolling pin and use a medium-sized heart cutter to make pink and brown hearts. Remove the centres of the hearts with a slightly smaller heart cutter, then fill them again with the opposite coloured small heart.  Place the cookies on the baking trays a few centimetres apart to allow for spreading, then bake for about 10 minutes or until lightly golden. Transfer the cookies to a wire rack to cool before eating. You can store any leftover cookies in an airtight container for about 2 weeks.....

Happy Baking xx

Monday, 14 February 2011

Happy Valentine's Day

To celebrate the Valentine's Day I thought I'd share with you some kitchen lovelies that I adore.

First up is this lovely heart shaped wooden spoon. Also available as a set of salad servers, what a perfect way to dish up a special meal with love.


Next up are these sweet measuring cups:


and this little heart-shaped frying pan - so cute!


Who could resist these pink doilies

Or this cake stand:


Lastly, what better way to make sure you don't mess up your clothes while you are baking than to wear this delightful apron:


All these items are so lovely, I'll definitely be adding them to my wishlish.

Have a lovely day xx

Tuesday, 8 February 2011

Stencilling

Have been playing with my new stencils this week - they take a bit of practice to use - but are really rewarding once you master them. Here's an example of what you can make.

Happy baking xx

Shabby chic loveliness

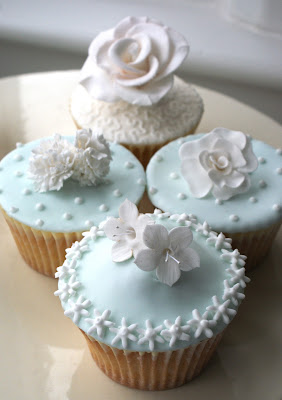
I've been playing around with pastels this week and practicing flower making. Here are a few cupcakes inspired by all things shabby chic.


Love the delicate contrast of baby blue against the white flowers. Looking forward to making more soon.

Happy baking xx

Thursday, 3 February 2011

Whoopie!

I was spoilt at Christmas and received a whoopie pie pan from Lakeland.

I've always wanted to make whoopie pies and now with the pan they are super easy. Here's how my first batch turned out:


If you want to make some here's what you need:

Ingredients (makes medium 16 whoopies)
  • 200g of unsalted butter
  • 1 large egg
  • 150g caster sugar
  • 125g creme fraiche (or sour cream)
  • 75ml skim milk
  • 1 tsp vanilla extract
  • ¾ tsp bicarbonate of soda
  • 275g plain flour
  • 100g marshmallows (I used chocolate (brown coloured) ones)
  • 200g icing sugar
Method:
Preheat the oven to 180°C (fan 160°C). Melt 75g of the butter and set aside. Using an electric hand mixer, whisk the egg until light and fluffy. Beat in the sugar, a third at a time, until thick and glossy. Beat in the melted butter, sour cream, 25ml of milk and the vanilla. Sift the bicarbonate of soda and flour into the bowl and beat until smooth. Using a wide piping nozzle or spoon, pipe or spoon the mixture on to the whoopie tray, or onto a lined baking tray (if you don't have a whoopie pan - try to space balls about 3-4 cm apart).  Bake for 12 minutes until almost evenly golden on top. Leave to cool for a few minutes, then transfer to a cooling rack.

For the marshamllow filling, heat the marshmallows and milk in a saucepan over a low heat, stirring until smooth, then cool. Beat 125g of butter until creamy and soft then gradually beat into the marshmallow until smooth. Sandwich two whoopie pies together with the marshmallow cream.

A lot of people serve whoopies without icing on the top, but if you want to add a glace icing then mix the icing sugar with 2-3 tablespoons of cold water. Spread a little on each whoopie, or you can drizzle it on (like I did) - whatever takes your fancy. Decorate with sprinkles or other decorations if you want too. I made little sugarpaste flowers and added some edible glitter. Nice and girly. Remember to leave the whoopies to set for a bit before serving. Once filled and iced the whoopies will keep for up to 6 hours.

I'm making some more whoopies this weekend (am experimenting with flavours) so will let you know how they go soon.

Happy Baking xx